
Let’s face it, here in the UK most of us have tiny postage stamp size back gardens, that are already full up with the shed, patio, lawn for the kids/dog, pond, greenhouse etc… The average 10 rod allotment (250sq meters) is only big enough for two full size pumpkin plants (at a push). Only a few of us are lucky enough to grow on farms, large estates or RHS gardens even. This is clearly something that is limiting the amount of entrants in the pumpkin and squash classes at the giant veg shows, along with the amount of time required to nurture a full 1000sq ft (92sq m) pumpkin plant for 6 months.
With this in mind I decided to experiment in 2017 and try to prove that large, competitive pumpkins can be grown in small spaces, outdoors in Northern Europe. So when I heard about the 150 square foot competition on bigpumpkins.com I just had to take part. For those of you that haven’t heard of it, this is a fun, informal (but with rules) competition that anyone can take part in to see who can grow the largest pumpkin in the smallest space. The main requirements are that no part of the plant must extend beyond a predetermined area covering 150 sq ft (14 square meters), and usually a seed with the genetics to compete for a Howard Dill Award (best looking, orange pumpkin) is chosen.
At the end of 2016, the current ‘record’ stood at 880lbs (390kg). The eagle eyed amongst you will have noticed that this is more than heavy enough to compete and win at all of the giant veg shows in the UK, other than the GPC weigh off in Southampton (but it will place you for prize money). And that’s exactly what I did at Malvern in 2017. Here’s how I did it. (Please note I’m not claiming any brownie points for ingenuity here, all of my methods have been shamelessly copied from other growers’ diaries on the big pumpkins website; I’m just collating everything I’ve learnt for the benefit of others)
Firstly, some advantages of growing in 150sq ft:
· Less ground space required per plant
· Less plant training and vine burying
· Numerous different methods for plant training
· Less soil cultivation work required (less compost)
· Reduced volume of watering needed
· Reduced time spent spraying/foliar feeding
· Easier to grow multiple plants each season
· Reduced amounts of fertiliser/mycorrhiza/compost tea required
And the disadvantages:
· More plant pruning
· Hard to work ‘through’ the plant
· More intense disease prevention programme required
· Reduced opportunity for pollination; you probably have two chances to set a female before you run out of room. If neither takes, you’re screwed!
· Plant will age quicker, as there are no new leaves to replace the oldest ones.
· You’re not even going to get close to mixing it with the big boys. Get any ideas of world domination out of your mind here.
Seed Sowing
I started my seeds off for the 150sq ft plot at the same time and with the same method as all my other pumpkins, mid-April. In reality, you could start a little later as the amount of time required for vegetative foliar growth is reduced due to the maximum size of the plant. Early May is about the latest I would begin however, as there is a lot be gained from an early pollination and fruit growth
when day light hours are at their longest in mid-summer (adjust for your local climate conditions, obviously). As always, soak seed first for an hour or so, then into damp, free draining seed compost at about 20c-30c. Seed choice is important, but you do not need to be investing hundreds of pounds in the world’s best seeds in order to achieve success here. I took it as an opportunity to grow my own 1333 seed (2096 Meier x 1998 Jutras) and a couple of the 918 Sullivan (1538 Jutras x 1317 Clementz) in the hope of getting a Howard Dill contender.
Planting out
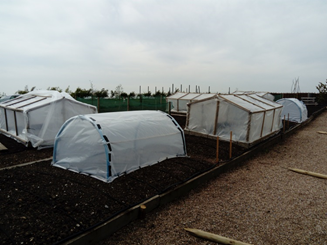
Once again, nothing different here; planted out first week of May just like all the ‘normal’ pumpkin plants. I did use plastic cloches to keep the plants out of the wind and cold weather for the first few weeks of their lives however. Some of the cloches I constructed were real Heath Robinson affairs, just two sections of blue water pipe, some bamboo canes, clear plastic, pegs, cable ties and duct tape. Black plastic was pegged down inside the cloches to help warm the earth. This was done a few weeks prior to planting out. Here’s a photo:
Plant Training
This is where things get different. Usually, a giant pumpkin would be trained in a Christmas tree fashion, main vine down the middle of the plot, with secondary’s trained at right angles to 15ft (5m) out, fruit pollinated at least 10-15ft (3-5m) out. The main aim is to get as much foliage growth behind the pollinated fruit as possible, as this is the engine that drives fruit growth, something like this is how I do it:

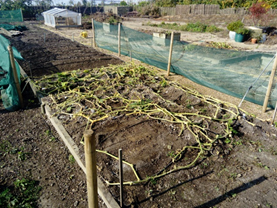
In a smaller space, you have to work harder and train the plant differently in order to get the maximum amount of leaf growth behind the fruit as possible. Leaf growth after the pumpkin is a luxury you can’t afford in a small space, so the aim is to have the plot nearly covered just as pollination takes place. There are numerous different methods for doing this, here’s the three I used (Please note all diagrams are indicative and not to scale):

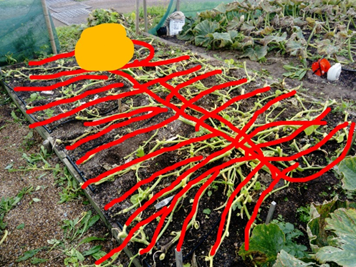
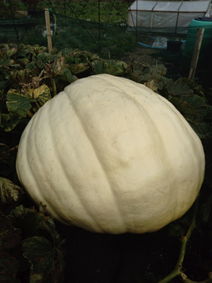
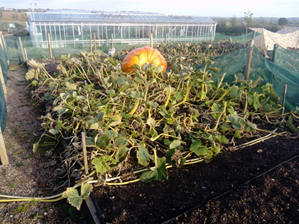
This uses the same pattern as normal, training each secondary perpendicular to the main, only with an extreme curve at the end of the main vine to position the pumpkin in the corner of the plot. The direction of the curve will depend on what side of the vine the female flower appears. You will probably have two opportunities to pollinate a flower on this curve before you run out room. Some tertiary growth is kept at the end of plot to fill all the available space. This was the method I used to grow the 965lb pumpkin that won at Malvern, minus some looping back round of secondaries, as shown above. Here’s how mine turned out:
Diagonal Main
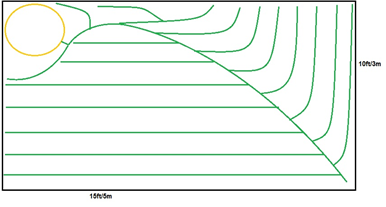
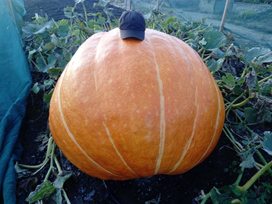
I like this method as it gives the best opportunity for a long main vine, and therefore more flexibility with where you can set a fruit (although fingers crossed it appears on the side you need!). Training secondary’s is also quite straightforward, with only a few awkward ones at the end of the plot near the fruit. This was how I grew the 968lb pumpkin that won the Howard Dill award at Southampton and is, so far, the largest pumpkin grown in the 150sq ft competition to date. Notably, it’s how the previous record was grown too. Here’s how mine turned out:
The main thing you are trying to achieve is the greatest total length of secondary vines behind the pumpkin as possible. Just as normal, tertiary vines are removed. The main advantage here is that the amount of vine burying (a boring, time consuming and messy job) is reduced purely because there are less vines to bury, and the job should be finished by the end of June. The biggest disadvantage is that there is no space for continued leaf growth, meaning the plant will age quicker and you must be very vigilant with disease control (especially powdery mildew) or you will lose the whole plant very quickly.
Fruit positioning is also important, aim to get pollination at the edge, or ideally in the corner of the patch. This makes accessing it for measuring/moving much easier and means less wasted space in the middle of the patch that could be used for leaf coverage. It is worth remembering that there will be less space to work around and inspect the growing pumpkin in comparison to ‘normal’ growing, as vines will be trained right up to and around the fruit. I checked around the fruits each day in the back half of the growing season making constant adjustments to the vines closest to the fruit, ensuring it always had room to grow.
You will also find that due to the extreme restriction in plant size, relative to what these plants can achieve, tertiary growth will be strong and rapid and must be removed. It was difficult to get into the centre of the plants without causing damage, so be careful. Occasionally, I would grow some tertiary growth out to fill a gap where I had lost leaves to wind/accidental damage. But remember; good air and light penetration through the plant is crucial to avoid disease taking hold, so don’t hold back with that pruning knife!
Spraying
As previously mentioned, control of powdery mildew is of utmost concern when growing smaller plants. In the UK (and presumably therefore the rest of the EU) there are very few chemical based fungicides available to the home gardener. For this reason, I use a product called SB Plant Invigorator. This is really a plant health tonic but shows ability to control powdery mildew through physical rather than chemical action. It also has the useful ability of controlling sap-sucking insects, and aphids proved a problem for me early in the season when leaf growth is soft and sappy (whitefly might also be a problem on pumpkins). Using a handheld 8 litre capacity sprayer (this was enough to do three plants), the plants were sprayed once a week, religiously. If you miss a week then you will notice a difference. To control aphids you may need to spray every three days until the problem is under control. To make this job easier, I extended the length of the lance to a couple of meters to reach into the centre of the plant without walking through it. To be effective, it is crucial to spray both the top and under side of the leaves. I made a point of spraying in the evening to avoid leaf scorch, but with enough sun left in the day to avoid the plants going to bed with wet leaf.
The only other foliar spray my plants get is once weekly with Epsom salts, as my soil conditions dictate that the plants need extra magnesium given to them.
Watering and Feeding
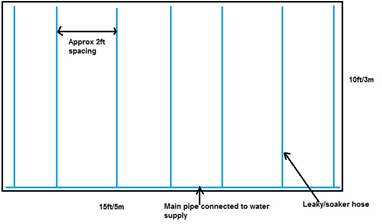
An endless topic that’s impossible to cover properly for everyone, as it is so dependent on soil conditions. My patch was a raised bed (6”/15cm) of really well worked, freely drained garden loam. Plants were watered via leaky hose irrigation going across the width of the patch, which was turned on for about 20 minutes each day, in the morning (8am). As a rough estimate, they probably received around 75 litres a day each. I had the luxury of being able to feed via a dosatron at the same time as watering; basically a time saving device but also allows for very accurate feeding. Nevertheless, all the products I used are available to every home gardener and can be applied via watering can. This was my weekly feeding regime during the period of fruit growth (in an ideal world, but very subject to change in a wet summer):
Monday: Water and Maxicrop Tomato feed. Spray SB Plant Invigorator
Tuesday: Water and Maxicrop Tomato feed.
Wednesday: Water, Maxicop Tomato feed, Azos.
Thursday: Water, Maxicrop Tomato feed, Azos. Spray Epsom salts
Friday: Water, Giant Veg Instant Compost Tea and Cal-Mag
Saturday: Water, Giant Veg Instant Compost Tea and Cal-Mag
Sunday: Water, Giant Veg Instant Compost Tea and Cal-Mag
Here’s a diagram of my leaky hose layout:
Other than that, everything else is exactly the same as growing giant pumpkins on a big plant (see my other article). You don’t have to limit yourself to 150sq ft, just think about how you utilise the space you do have available to its maximum potential. Ultimately, the more ground you can cover with leaf, the greater chance you have of growing a bigger pumpkin. Consistency with feeding and watering is key, never let the plants get a growth check (delayed potting on/exposure to cold) and keep the fruits covered with a sheet at all times and you should be good to go, Mother Nature and acts of God notwithstanding!
You can find Matt’s seed’s here
Grow ‘em Big
Matt Oliver
January 2018
Global Headquaters, Cwmbran South Wales United Kingdom
info@giantveg.co.uk